GET WATER DAMAGE HELP NOW

Speak with our Restoration Expert

DIY restoration vs. professional restoration
Uncategorized

DIY vs. Professional Restoration: A Complete Cost and Risk Analysis Guide

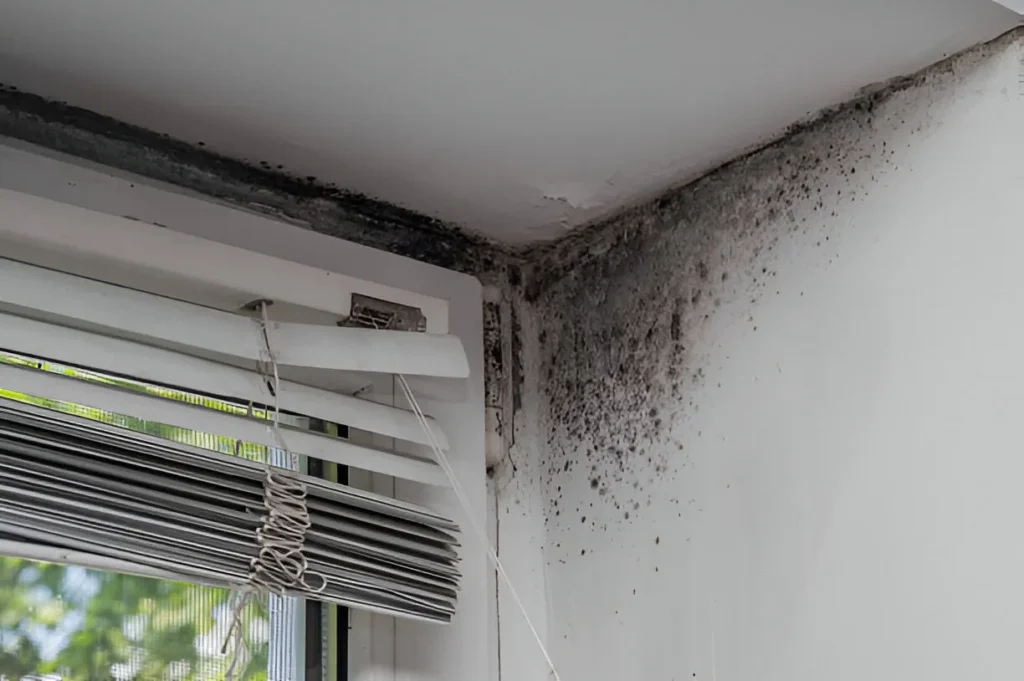
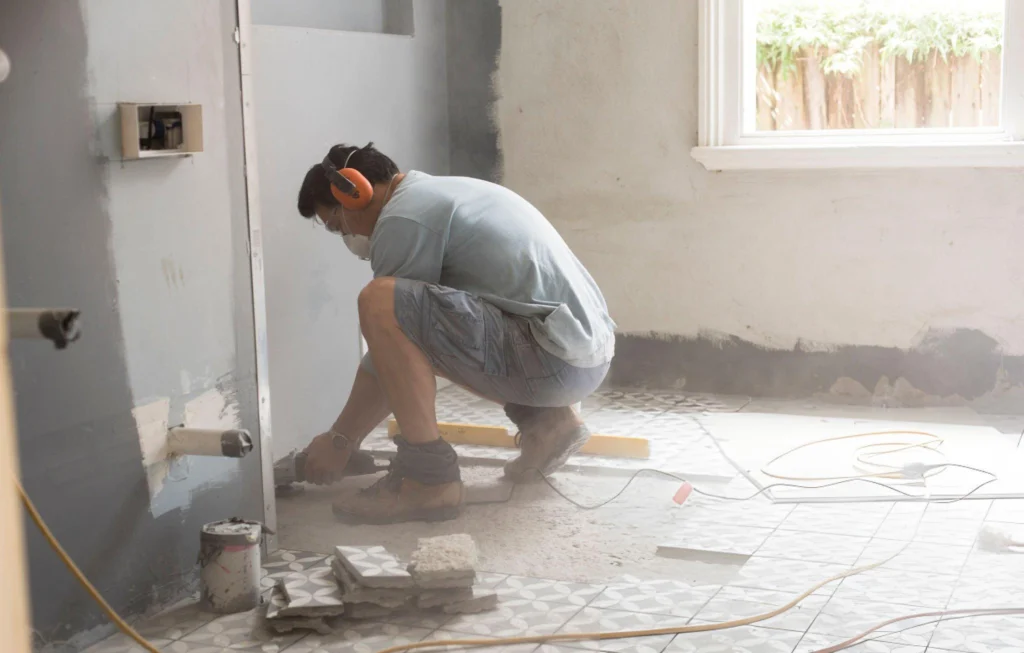
When disaster strikes your home through water damage, fire, or mold growth, homeowners face a critical decision: attempt restoration yourself or hire professional services. While DIY restoration might seem like an obvious money saver, the reality involves hidden costs, safety risks, and potential for incomplete repairs that could cost significantly more in the long run. Understanding the True Cost of DIY Restoration Water Damage DIY Costs DIY water damage restoration requires substantial upfront investment in equipment and supplies. For a typical small job, homeowners can expect to spend between $600 and $3,100 on essential items including water extraction equipment ($100-$500), dehumidifiers and fans ($150-$400), cleaning supplies ($50-$200), and replacement materials ($300-$2,000).​ However, these costs represent only the visible expenses. The hidden costs of DIY water restoration include potential mold growth from incomplete drying, structural damage from improper assessment, and the significant time investment required for thorough restoration.​ Fire and Smoke Damage DIY Costs Fire damage restoration presents even greater challenges for DIY attempts. Initial costs range from $375 for minor smoke cleanup to over $2,550 for more extensive damage. This includes cleaning supplies and PPE ($50-$150), removal tools ($25-$100), repair materials ($200-$2,000), and safety equipment ($100-$300).​ The complexity of fire damage extends beyond visible burn marks. Smoke penetration into HVAC systems, wall cavities, and structural materials requires specialized knowledge and equipment that DIY methods typically cannot address effectively.​ Mold Remediation DIY Costs DIY mold remediation appears most affordable initially, with costs ranging from $355 to $2,100 for small areas. This includes cleaning products ($30-$100), PPE and safety gear ($50-$200), tools and equipment ($75-$300), and replacement materials ($200-$1,500).​ However, mold remediation carries significant health risks when performed incorrectly, and incomplete removal often leads to regrowth requiring professional intervention.​ Professional Restoration Pricing Water Damage Professional Costs Professional water damage restoration typically costs between $1,382 and $6,357, with an average of $3,842. Pricing varies by water category: clean water restoration costs $3.50 per square foot, gray water $5.25 per square foot, and black water $7.50 per square foot.​ Professional services include comprehensive assessment, water extraction, structural drying, dehumidification, sanitization, and restoration of damaged materials. The investment covers specialized equipment, trained technicians, and warranty protection.​ Fire Damage Professional Costs Professional fire damage restoration ranges from $3,000 for minor single-room damage to over $100,000 for severe extensive damage. The national average cost is $20,470, with typical ranges between $2,900 and $38,325.​ Professional fire restoration addresses visible damage, hidden smoke penetration, structural integrity issues, and complete odor elimination using advanced techniques like ozone treatments and thermal fogging.​ Mold Remediation Professional Costs Professional mold remediation costs typically range from $1,200 to $3,750, averaging $2,300 for most homeowners. Pricing varies by affected area: small areas under 100 square feet cost $500-$1,500, medium areas (100-1,000 square feet) cost $1,500-$3,000, and large areas over 1,000 square feet can exceed $10,000.​ Critical Risk Analysis: Why DIY Often Costs More Health and Safety Hazards DIY restoration exposes homeowners to serious health risks including respiratory problems from mold spores, chemical exposure from fire damage, and contamination from black water. Professional restoration teams use proper safety equipment and follow established protocols to minimize these risks.​ Incomplete Restoration Leading to Future Problems The most significant hidden cost of DIY restoration is incomplete remediation. Water damage that appears resolved can lead to mold growth within 24-48 hours if moisture remains trapped in building materials. Fire damage DIY attempts often fail to address smoke penetration in HVAC systems and wall cavities, leading to persistent odors and potential health issues.​ Mold remediation is particularly risky for DIY attempts, as improper containment can spread spores throughout the property, potentially affecting areas that were previously uncontaminated. Professional remediation includes proper containment, HEPA filtration, and post-remediation testing to ensure complete elimination.​ Insurance Complications Many insurance policies require professional restoration services for coverage approval. DIY attempts may void insurance coverage or result in claim denials, leaving homeowners responsible for the full cost of restoration plus any additional damage caused by inadequate repairs.​ Structural Integrity Issues DIY restoration often fails to identify structural damage that poses safety risks. Fire damage can compromise electrical systems and structural integrity in ways that aren’t immediately visible to untrained individuals. Water damage can weaken foundations and framing if not properly assessed and addressed.​ When DIY Makes Sense (Limited Scenarios) DIY restoration is only appropriate for very minor damage scenarios: small water spills from clean sources affecting less than 10 square feet, minor smoke damage limited to surface cleaning, or small surface mold growth under 10 square feet.​ Even in these limited cases, homeowners must have proper safety equipment, follow established protocols, and monitor for signs of recurring problems.​ The Professional Advantage: Long-Term Value Comprehensive Assessment and Documentation Professional restoration companies provide thorough damage assessment using moisture meters, thermal imaging, and other specialized tools to identify hidden damage. This comprehensive approach ensures all affected areas are addressed, preventing future problems and providing proper documentation for insurance claims.​ Specialized Equipment and Techniques Professional restoration utilizes industrial grade equipment including commercial dehumidifiers, air movers, HEPA filtration systems, and specialized cleaning agents not available to consumers. These tools achieve faster, more thorough restoration than consumer-grade equipment.​ Warranty and Quality Assurance Professional restoration services typically include warranties on their work and follow industry standards like IICRC certification. This provides homeowners with recourse if problems develop and assurance that the work meets professional standards.​ Time and Stress Reduction Professional restoration significantly reduces the time required for restoration and eliminates the stress of managing complex restoration projects. This allows homeowners to focus on other priorities while ensuring proper restoration of their property.​ Making the Right Decision for Your Situation The decision between DIY and professional restoration should consider the extent of damage, your available time and expertise, health and safety risks, insurance requirements, and long-term cost implications. While professional restoration requires a higher upfront investment, it typically provides better value through comprehensive remediation, warranty protection, and prevention of future problems.​ For most restoration scenarios involving significant damage, professional services offer superior results and

insurance claim tips
Uncategorized

Insurance Claim Tips & Pitfalls in Restoration: A Complete Guide

When disaster strikes your home, filing an insurance claim for water, fire, or mold damage can be as stressful as the damage itself. At H2O Restoration, we understand how overwhelming it feels to navigate insurance paperwork, restoration timelines, and coverage questions while trying to get your life back to normal. This detailed guide breaks down essential insurance claim tips, common pitfalls, and expert strategies to help you get the most from your claim and avoid costly mistakes. Why Insurance Claims for Restoration Can Be Tricky Home restoration after water, fire, or storm damage involves multiple moving parts. Homeowners often assume their policy covers everything, but insurance companies operate under strict definitions of what qualifies as covered loss. Misunderstanding these terms can lead to partial payouts or outright denials. Key challenges include: Challenge Why It Matters Common Result Incomplete documentation Missing photos or reports make claims hard to verify Delayed or reduced payment Poor communication Lack of clarity between adjusters and contractors Conflicting repair estimates Misunderstanding policy language Exclusions or deductibles can surprise homeowners Unexpected out-of-pocket costs Skipping mitigation steps Failing to prevent further damage Denied claims due to negligence At H2O Restoration, our project managers are trained to work directly with insurance adjusters to minimize these issues from the start. Step-by-Step Guide to Filing a Restoration Insurance Claim If your property has suffered damage, time is critical. Following these steps can significantly improve your chance of a successful insurance payout. 1. Assess the Damage Immediately Once it’s safe, inspect the affected areas and take comprehensive photos and videos. Document everything before cleanup begins — from ceiling stains to damaged flooring and furniture. Pro Tip: Include wide-angle shots and close-ups with timestamps. Insurance companies prefer visual proof before any restoration work begins. 2. Stop Further Damage (Mitigation) Most policies require homeowners to take reasonable steps to prevent further damage. This may include water extraction, temporary boarding, or tarping roofs. Failing to mitigate can cause insurers to deny part of the claim for “avoidable damage.” H2O Restoration offers emergency mitigation services within hours to ensure your property stays compliant with insurance guidelines. 3. Review Your Policy Carefully Before filing, read your insurance policy or ask your restoration contractor to help interpret it. Look for: Policy Section What to Check Coverage limits Maximum amount covered per incident Deductibles How much you must pay out-of-pocket Exclusions Damage types not covered (like gradual leaks) Additional living expenses (ALE) Coverage for hotel stays or rentals during repair If you’re unsure, H2O Restoration can help you review your policy and understand what’s eligible for claim reimbursement. 4. File the Claim Promptly Most insurance companies have strict time limits for filing claims. Contact your insurer as soon as possible and request a claim number. Provide your initial documentation and describe the incident clearly and honestly. Include the following in your initial report: The Role of Your Restoration Contractor in the Claim Process Choosing a certified restoration company like H2O Restoration can make or break your insurance experience. Contractors play a vital role in documenting, estimating, and communicating with adjusters. Restoration Step Contractor’s Responsibility Damage Assessment Conduct a professional inspection and moisture mapping Estimate Preparation Provide detailed line-item estimates using industry-standard software (like Xactimate) Insurance Communication Coordinate with adjusters to justify repair scope Restoration Execution Handle demolition, drying, rebuilding, and quality control Working with an experienced restoration team means fewer disputes and faster claim approval. Common Pitfalls in the Restoration Insurance Process Even diligent homeowners make mistakes during insurance claims. Avoid these pitfalls to protect your rights and speed up recovery. Pitfall 1: Stating Repairs Too Soon Starting major repairs before your adjuster’s inspection can void parts of your claim. Always wait until your insurer approves the scope, except for emergency mitigation. Pitfall 2: Underestimating Damage Water and smoke damage can spread behind walls and under floors. Without professional inspection, hidden damage can go unnoticed until it’s too late to include in your claim. Avoid this by: Requesting a full moisture inspection from H2O Restoration before finalizing your claim. Pitfall 3: Accepting the First Settlement Offer Insurance companies may issue quick lowball offers to close claims early. You have the right to request a reinspection or submit additional documentation. Pitfall 4: Poor Communication with Adjusters Many claims stall because homeowners forget to follow up or fail to clarify details. Keep records of all calls, emails, and letters related to your claim. Pitfall 5: Choosing the Cheapest Contractor Low bids can result in poor workmanship and additional costs later. Always choose a licensed, insured, and IICRC-certified restoration company with experience in insurance coordination. How H2O Restoration Helps Maximize Your Claim At H2O Restoration, we’ve helped hundreds of homeowners recover from disasters while maximizing their insurance benefits. Our process is transparent, efficient, and insurance friendly. Our Insurance Coordination Process Step What We Do Benefit to You Initial Inspection Detailed damage evaluation and photo documentation Strengthens your claim Estimate Submission Use of Xactimate estimates aligned with insurance standards Faster approval Direct Adjuster Liaison Communicate directly with your insurer’s adjuster Reduces stress and confusion Restoration Execution Handle repairs from start to finish Seamless recovery Final Walkthrough Ensure quality and satisfaction Peace of mind and full transparency We act as your advocate throughout the claim process, ensuring fair coverage and timely payment. Insurance Claim Tips from the Experts Tip #1: Keep a Claim Journal Document every step who you spoke with, when, and what was discussed. These records can protect you if disputes arise. Tip #2: Save Every Receipt From hotel stays to cleaning supplies, keep receipts for all expenses related to the damage. Many are reimbursable under Additional Living Expenses (ALE) coverage. Tip #3: Request Written Approvals Always ask for written confirmation before authorizing major repairs. Verbal agreements can lead to misunderstandings. Tip #4: Understand Depreciation Most policies include depreciation deductions for older materials. However, “replacement cost” coverage can reimburse the full value once repairs are completed. Tip #5: Don’t Settle for Less If you feel underpaid, request a supplemental claim with

mold cincinnati
Uncategorized

Does Insurance Cover Mold Removal? Here’s What Cincinnati Residents Should Know

Mold is one of those problems every homeowner hopes to avoid. It spreads quickly, damages property, and can even impact your health if left untreated. Here in Cincinnati, where we deal with humid summers, rainy springs, and freezing winters that sometimes cause burst pipes, mold issues are unfortunately common. When it appears, many residents ask the same question: will my insurance pay for mold removal? The answer isn’t always straightforward. Insurance can cover mold removal in some situations, but it often depends on what caused the mold in the first place. At H2O Restoration, we’ve helped countless families in Cincinnati navigate both mold damage and the insurance process, so let’s break it down in simple terms. When Insurance Usually Covers Mold Homeowners insurance policies typically step in when mold is the result of what insurers call a “covered peril.” That means the damage was sudden and accidental, not something that developed over months or years. For example, if a pipe bursts during a harsh Cincinnati winter and water seeps into your walls, any mold that develops as a direct result of that water damage may be covered. The same goes for mold caused by a washing machine overflow, a sudden roof leak during a storm, or water used to put out a house fire. In these cases, the mold is seen as part of the damage from the unexpected event, and cleanup is often included. That said, coverage isn’t unlimited. Many policies cap mold remediation benefits, sometimes at just a few thousand dollars. If the cleanup requires major repairs, the insurance payout may not cover all of it. Some companies offer endorsements or add-on coverage that increase mold protection limits, which is worth asking your insurance agent about if you live in a moisture-prone area. When Insurance Won’t Cover Mold On the other hand, insurance generally does not cover mold that develops from neglect or ongoing issues. If a small leak under your sink goes unnoticed for months, or if poor ventilation allows condensation to build up until mold grows, your policy probably won’t pay. Insurers consider this type of damage “preventable,” meaning homeowners are expected to take care of maintenance and repairs before they become major problems. Flooding is another gray area. Standard homeowners insurance does not cover mold from floodwater caused by heavy rains or overflowing rivers. For that, you’d need a separate flood insurance policy. Similarly, if mold results from a sewer backup or sump pump failure, you would need a special water backup endorsement for it to be covered. Why Documentation Matters If you discover mold after a sudden water event, documentation is your best friend. Take clear photos of the mold and the source of the water damage. Write down when you first noticed the problem, when the event occurred, and what steps you took to address it. The more evidence you provide to your insurance company, the smoother the claims process will be. At H2O Restoration, we often assist homeowners by working directly with insurers. We provide detailed assessments, moisture readings, and professional reports that support your claim. This helps ensure you receive the maximum coverage available under your policy. Prevention Is Always Best Even if your insurance might cover some scenarios, it’s always easier and less stressful to stop mold before it starts. In Cincinnati’s climate, that means staying on top of maintenance. Fix leaks promptly, keep your gutters clear, and make sure your basement or crawlspace has good drainage. A dehumidifier can help keep humidity levels in check, especially in summer months. And when temperatures drop, insulating pipes and keeping your home heated can prevent the frozen or burst pipes that often lead to mold growth in winter. These simple habits not only reduce the risk of mold but also protect your home from water damage in general. Insurers are far more likely to approve claims when you’ve taken reasonable steps to prevent problems in the first place. How H2O Restoration Can Help Dealing with mold is stressful, whether insurance covers it or not. That’s where we come in. At H2O Restoration we specialize in both water damage restoration and mold remediation. Our team responds quickly, removes moisture at the source, and safely eliminates mold before it spreads further. We also understand how insurance works and can help guide you through the process. Our services include: thorough water extraction and drying, professional mold testing and removal, and long-term solutions to prevent future growth. Most importantly, we do all of this with the urgency and care you deserve, because we know how disruptive mold and water damage can be to your family’s life. Final Thoughts So, does insurance cover mold removal? The short answer: sometimes. If the mold is caused by a sudden and accidental event—like a burst pipe in a Cincinnati winter—your policy may step in. But if the mold comes from long-term leaks, humidity, or flooding without proper coverage, the cost will likely fall on you. That’s why it’s so important to read your policy carefully, keep up with maintenance, and know your options for additional coverage. And if mold does appear, remember that H2O Restoration is here to help Cincinnati homeowners with fast, reliable cleanup and restoration. Don’t wait until a small problem becomes a big one—whether it’s burst pipes, water damage, or mold, we’re just a call away.

frozen pipe
Uncategorized

Simple Steps to Prevent Frozen or Burst Pipes in Cincinnati Winters

Cincinnati winters can be beautiful, but the freezing temperatures can wreak havoc on your home’s plumbing. Every year, countless homeowners deal with frozen pipes that burst, leading to expensive water damage, stress, and major disruptions. Fortunately, with a little preparation, you can protect your home and avoid becoming part of that statistic. At H20 Restoration, we’ve seen firsthand how damaging burst pipes can be. That’s why we want to share some simple, effective steps you can take to prevent frozen or burst pipes in Cincinnati winters. Why Pipes Burst in Winter Before diving into prevention tips, it’s important to understand why this happens. Knowing this helps you focus your efforts where they’ll matter most. Step 1: Insulate Your Pipes One of the simplest and most affordable ways to prevent frozen pipes is insulation. Think of it like giving your pipes a winter coat. Step 2: Seal Cracks and Drafts Cold air sneaking into your home is one of the biggest culprits of frozen pipes. By blocking cold drafts, you’ll not only protect your plumbing but also save on heating bills. Step 3: Keep Water Moving Still water freezes faster than moving water. To avoid frozen pipes in Cincinnati winters, keep a trickle of water running when temperatures plunge. This simple step can make a huge difference. Step 4: Keep the Heat On You may be tempted to lower the thermostat to save money, but doing so can put your pipes at risk. Consistent warmth is your best defense against frozen pipes. Step 5: Disconnect and Drain Outdoor Hoses Outdoor plumbing is especially vulnerable in Cincinnati winters. You can also install frost-proof hose bibs, which provide extra protection. Step 6: Add Extra Heat in Trouble Spots Some areas of your home may need a little extra help staying warm. Even a few degrees of extra warmth can prevent disaster. Step 7: Know Where Your Main Water Shut-Off Valve Is Even with all precautions, emergencies can still happen. If a pipe does burst, knowing how to shut off your main water supply quickly can save thousands of dollars in damage. This is one of the most important steps for protecting your home. Step 8: Winterize When Traveling If you’re heading out of town during the winter, your home will be at higher risk. A little planning before you leave can prevent you from coming home to a flooded house. What To Do If Your Pipes Freeze Sometimes, despite your best efforts, pipes may still freeze. Here’s what to do: If you can’t locate the frozen area, can’t thaw it, or the pipe has already burst, call a professional immediately. Why Burst Pipes Are So Dangerous A small crack in a pipe can release hundreds of gallons of water in a single day. The damage spreads quickly: That’s why prevention is always better than repair. But if the worst happens, quick action is key. How H20 Restoration Can Help At H20 Restoration, we specialize in water damage restoration in Cincinnati, and we’ve helped countless families recover from burst pipes. Here’s what we offer: We know how stressful water damage can be. That’s why our mission is to restore not just your home, but also your peace of mind. Final Thoughts Frozen and burst pipes are one of the biggest risks of Cincinnati winters, but with the right preparation, you can keep your plumbing safe. To recap: Taking these simple steps to prevent frozen or burst pipes will save you money, protect your home, and help you enjoy the winter season worry-free. And if you ever find yourself dealing with water damage, remember that H20 Restoration is just a call away—ready to help you recover quickly and safely.

Scroll to Top