GET WATER DAMAGE HELP NOW

Speak with our Restoration Expert

Guide for Flooring Restoration
Uncategorized

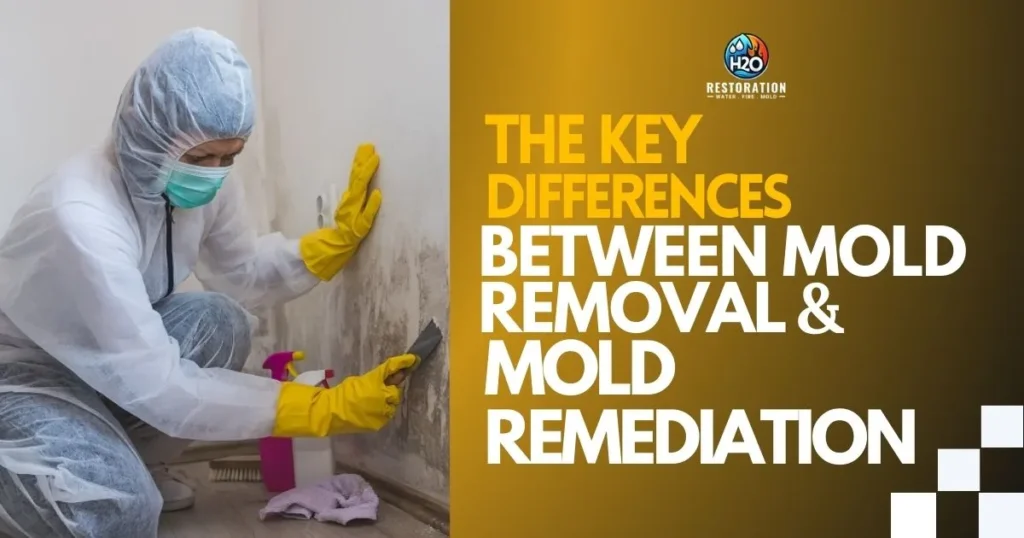
Urgent Signs You Need Mold Remediation Now

Investing in your flooring is a decision that bears long-term benefits, enhancing the comfort, style, and welcoming ambiance of your home for decades to come. However, despite diligent maintenance efforts, your flooring is susceptible to wear and fading over time, detracting from the overall appeal of your property. While replacing your flooring is an option, opting for flooring restoration presents a more cost-effective solution. Flooring restoration is a comprehensive process designed to rejuvenate your floors, addressing scratches, dents, stains, and other imperfections that accumulate over time. This process breathes new life into your floors, restoring their pristine appearance and fortifying them against future damage. It enhances the aesthetics of your space and prolongs the lifespan of your flooring by several years. As a budget-friendly alternative to replacement, flooring restoration transforms tired and worn-out floors into rejuvenated focal points of your home. Investing in restoration not only enhances the visual appeal of your space but also optimizes the longevity and durability of your flooring investment for years to come. What is Flooring Restoration? The process of renewing and revitalizing worn, damaged, or outdated floors to improve their appearance, durability, and functionality. This restoration process can involve various techniques and methods depending on the type of flooring material and the extent of damage or wear. Common types of flooring that may undergo restoration include hardwood, laminate, vinyl, tile, concrete, and stone floors. Flooring restoration typically includes steps such as cleaning, repairing damage, sanding or refinishing, and applying protective coatings. The goal of flooring restoration is to breathe new life into old or damaged floors, extending their lifespan and enhancing the overall aesthetic and value of the space. It can be a cost-effective alternative to full-floor replacement, especially for floors with minor damage or wear. Additionally, restoring existing floors can contribute to sustainability efforts by reducing the need for new materials and minimizing waste. Steps for Preparing Your Floors for Restoration 1. Clean the Surface Begin by thoroughly cleaning the floors to remove any dirt, dust, or debris. Use a broom, vacuum cleaner, or damp mop to ensure the surface is free from contaminants. 2. Inspect for Damage Carefully examine the floors for any signs of damage such as scratches, dents, stains, or water damage. Take note of areas that require special attention during the restoration process. 3. Repair Any Damage Address any identified damage by repairing scratches, filling in dents, or treating stains. Use appropriate repair kits or products according to the type and severity of the damage. 4. Strip Existing Finish If necessary, strip the existing finish from the floors using a suitable stripping agent or sanding equipment. This step is crucial for preparing the surface for refinishing. 5. Sand the Surface After stripping the existing finish, sand the floors to smooth out any imperfections and create a uniform surface. Start with coarse-grit sandpaper and gradually move to finer grits for a smooth finish. 6. Clean Thoroughly Once sanding is complete, thoroughly clean the floors again to remove any dust or debris generated during the sanding process. Ensure the surface is clean and dry before proceeding to the next step. 7. Apply Stain or Finish Depending on your desired outcome, apply a wood stain to enhance the color of the floors or apply a new finish to protect and beautify the surface. Follow manufacturer instructions for application and drying times. 8. Allow Proper Drying Time Allow sufficient time for the stain or finish to dry completely before walking on the floors or placing furniture back in the room. This ensures a durable and long-lasting restoration result. 9. Apply Protective Coating Once the stain or finish has dried, consider applying a protective coating such as polyurethane to further enhance the durability and longevity of the wood floors. 10. Finish with Final Touches Add any final touches such as applying polish or wax to bring out the natural shine and luster of the floors. Stand back and admire your beautifully restored floors. Floor Restoration Process Assessment Begin by evaluating the current state of the floor, including identifying any damage, wear and tear, or other issues that need to be addressed. Preparation Prepare the floor for restoration by clearing the area of furniture, rugs, and other obstacles. Clean the surface thoroughly to remove dirt, dust, and debris. Repair Address any damage to the floor, such as scratches, dents, cracks, or stains. Repair or replace damaged flooring materials as needed to restore structural integrity. Sanding Use a floor sander equipped with appropriate grit sandpaper to remove the existing finish and smooth out imperfections on the floor surface. Sanding also helps to create a uniform surface for refinishing. Cleaning Vacuum or sweep the floor to remove sanding dust and debris. Wipe the surface with a tack cloth or damp mop to ensure it is clean and free from residue before proceeding. Staining  If desired, apply a wood stain to the floor to enhance or change the color of the wood. Follow manufacturer instructions for application and drying times. Finishing Apply a protective finish to the floor to seal and protect the surface from damage and wear. Choose a finish appropriate for the type of flooring material and the desired level of durability and sheen. Drying Allow the finish to dry completely according to manufacturer recommendations before walking on or replacing furniture on the floor. Proper ventilation is important to aid in the drying process. Inspection Once the finish has dried, inspect the floor for any missed spots or imperfections. Touch up as needed before allowing the floor to cure completely. Final Touches Add any final touches, such as applying wood polish or wax, to enhance the shine and luster of the restored floor. Maintenance Implement a regular maintenance routine to preserve the beauty and longevity of the restored floor, including routine cleaning and periodic refinishing as needed. Floor Maintenance and Protection To keep your floors looking their best, it’s important to stick to a regular cleaning routine. This means sweeping, vacuuming, or mopping regularly to

The Key Differences Between Mold Removal and Mold Remediation 
Uncategorized

The Key Differences Between Mold Removal and Mold Remediation 

Do the terms mold removal and mold remediation confuse you? Are you wondering which is the right solution for your mold problems? You’ve come to the right place for answers. Mold is a common issue in many homes and buildings, often causing worry and uncertainty.  According to an analysis conducted by the National Institute for Occupational Safety and Health, approximately 47% of residential buildings across the United States exhibit either visible mold growth or emit a mold odor. Knowing the difference between mold removal and mold remediation is helpful, as it can significantly impact how effectively and safely the problem is addressed. Mold removal and mold remediation are terms often used interchangeably, alongside mold mitigation and mold abatement, all of which aim to eliminate or treat mold. However, the key difference lies in the process involved and whether it addresses the root cause of the mold problem. What is a Mold? Mold, a form of fungus, flourishes in environments characterized by dampness and high humidity levels. It manifests in a spectrum of colors and frequently inhabits spaces such as bathrooms, basements, and kitchens. In addition to causing property damage, mold presents significant health hazards, particularly for individuals with allergies or respiratory ailments. What is Mold Removal? Mold removal refers to the process of eliminating mold from a given area. While the term may sound straightforward, there’s more to it than meets the eye. Simply “removing” mold might imply mere surface cleaning without addressing the underlying issue: identifying and rectifying the source of mold growth. Though molds are a natural part of our environment, complete eradication is unattainable. Mold spores exist indoors and outdoors ubiquitously, making total elimination impossible. The key lies in managing their growth. Typically harmless, mold spores become problematic when they settle in damp environments and proliferate. In such cases, mold removal becomes necessary. However, a superficial removal process may not suffice, especially for larger infestations, unless the affected area is relatively small. What is Mold Remediation? Mold remediation encompasses all the steps taken to eliminate hazardous mold growth. This includes testing, removal, demolition, sanitization, containment, and cleaning, depending on the type and location of the mold.  A reputable restoration company, recognizing the serious implications of mold growth, focuses on reducing mold levels to a safe threshold rather than making unrealistic claims of complete removal. How Mold Remediation Operates? The process of mold remediation is tailored to each unique mold growth situation, as different cases demand different solutions. However, the core steps of mold remediation generally include: Mold Inspection and Assessment Thoroughly examining the property to identify the type and source of mold growth is crucial for determining the most effective remediation approach. Containment Mold spores can become airborne during removal and settle on other surfaces, so expert remediation involves isolating contaminated areas to prevent further spread. Cleanup and Air Filtration Depending on the location of the mold, safe cleaning methods are employed to prevent spores from dispersing into the air, especially on non-porous or semi-porous materials. Disposal or Removal The type of material affected dictates whether removal or disposal is necessary, particularly for porous materials where removal is often preferred. Sanitization Following removal, affected items such as furniture, curtains, floors, and walls undergo thorough cleaning and deodorization, often utilizing fogging equipment to eliminate odors. Preventative Recommendations Mold remediation concludes with professionals providing homeowners with preventive measures to hinder future mold growth, ensuring a comprehensive solution to the issue. Mold remediation isn’t complete without expert advice on preventing future mold problems. It underscores the importance of proactive measures for long-term mold management. A Comprehensive Overview of the Difference Targeted Intervention Mold Removal focuses solely on visible mold growth, often without addressing the underlying issues contributing to mold infestation, such as moisture or ventilation problems. In contrast, Mold Remediation takes a holistic approach, identifying and addressing the root cause of mold growth to prevent recurrence. Comprehensive Solution Mold Remediation aims to reduce mold levels comprehensively, ensuring safety for occupants and the structural integrity of the building. This involves not only removing visible mold but also addressing airborne mold spores and hidden mold growth behind walls or in HVAC systems.  Mold Removal, on the other hand, primarily addresses surface mold without considering the broader implications of mold presence or potential health risks. Process Extensiveness Mold Remediation involves a thorough and systematic process that includes identifying the cause of mold growth. It implements measures to control its presence and provides preventive recommendations to mitigate future mold issues effectively. This may include measures such as repairing leaks, improving ventilation, or installing dehumidifiers.  In contrast, Mold Removal is typically more focused on surface cleaning, such as scrubbing or wiping visible mold from affected areas, without addressing underlying causes. Specialized Techniques Mold Remediation often employs specialized equipment and methods for comprehensive treatment. This may include the use of air filtration systems, containment barriers to prevent cross-contamination, and HEPA vacuuming to remove mold spores from surfaces and the air. Mold Removal, on the other hand, may rely on simpler cleaning methods without utilizing specialized equipment or techniques. Specialized Techniques Mold Remediation professionals are trained to assess and address mold issues comprehensively; taking into account factors such as moisture levels, ventilation, and building materials. They have the expertise to identify and mitigate underlying causes effectively, reducing the risk of recurring mold problems. In contrast, Mold Removal may lack the expertise to identify hidden mold growth or underlying moisture issues. This leads to incomplete remediation and potential recurrence of mold problems. Verification Process Mold Remediation often includes post-remediation verification to ensure that mold levels have been successfully reduced to safe levels. This may involve air quality testing or visual inspections to confirm the effectiveness of the remediation process. This verification provides assurance that the remediation efforts have been thorough and effective.  In contrast, Mold Removal processes may not include this step, leading to uncertainty about the effectiveness of the removal process and the potential for mold recurrence. Your Partner in Addressing Mold Issues When you spot

Fire Restoration_ How long does it take
Uncategorized

Fire Restoration: How long does it take?

Across the United States, severe drought and record-breaking summer heat have increased the risk of wildfires in many areas. Homes and businesses are in danger, and even if a fire is put out quickly, the damage can be life-changing. Fires can devastate communities, from rural areas to busy cities, and they pose a serious threat to both property and lives. To stay safe, communities need to be prepared. That means taking steps to prevent fires and improving how we respond to emergencies. As we face the challenges of climate change and rising fire risks, it’s more important than ever to come together and support each other. We must build resilience and work together to overcome these challenges and emerge stronger than before. However, we understand that your primary concern right now is the timeline for restoring your home. So, here’s some more information about how long it typically takes to restore a home after it’s been damaged by fire. What is fire restoration? Fire restoration refers to the process of repairing, cleaning, and restoring property that has been damaged by fire. It involves various steps such as removing debris, assessing the extent of the damage, mitigating further damage, cleaning and deodorizing surfaces affected by smoke and soot, repairing or replacing damaged structures, and restoring the property to its pre-fire condition. Fire restoration professionals use specialized equipment and techniques to safely and effectively restore damaged properties, helping homeowners and businesses recover from the devastating effects of fire incidents. Key Influences on Fire Restoration Project Duration Extent of Damage The severity and extent of the fire damage play a significant role in determining the restoration timeline. Properties with extensive damage will naturally require more time to restore compared to those with minor damage. Type of Damage The type of damage caused by the fire, whether it’s structural damage, smoke damage, water damage from firefighting efforts, or a combination of these, will affect the restoration timeline. Each type of damage requires specific restoration techniques and processes, which can vary in complexity and time requirements. Size of Property  The size of the property affected by the fire affects the restoration duration. Larger properties generally require more time for assessment, cleanup, and repair than smaller properties. Water Damage Water damage resulting from firefighting efforts can prolong the restoration process. Drying out the property and mitigating water damage may require additional time and equipment. Extent of Smoke and Soot Residue Smoke and soot residues can spread throughout the property, affecting surfaces, contents, and indoor air quality. Cleaning and deodorizing these residues may be time-consuming, especially in hard-to-reach areas. Safety Considerations Safety is paramount during fire restoration, and certain safety considerations may prolong the timeline. This includes ensuring the property is structurally sound before restoration work begins, addressing any hazardous materials, and implementing safety protocols for restoration workers. Insurance Processes Dealing with insurance claims and approvals can also impact the restoration timeline. This includes assessing the damage, documenting the loss, and waiting for approvals from insurance companies before restoration work can commence. Availability of Materials and Resources The availability of materials, equipment, and skilled labor can affect the speed of restoration efforts. Delays in sourcing materials or scheduling contractors can extend the timeline. Regulatory Requirements Compliance with local building codes, permits, and regulatory requirements may add time to the restoration process. Ensuring that all work meets regulatory standards is essential but can contribute to delays. Scope of Work The complexity and scope of the restoration project will influence the timeline. Projects involving extensive repairs, reconstruction, or specialty restoration services may take longer to complete. Coordination and Communication Effective coordination and communication among all parties involved in the restoration process are essential for keeping the project on track. Delays in communication or coordination issues can lead to setbacks and prolong the timeline. Outline of a Typical Fire Restoration Timeline  Immediate Response (0-24 hours) Assessment and Inspection (1-3 days) Water Damage Restoration (1-7 days) Smoke and Soot Removal (1-7 days) Structural Repair and Reconstruction (1 week to several months) Content Cleaning and Restoration (1-4 weeks) Final Inspection and Testing  (1-2 weeks) Completion and Reoccupation (2-4 weeks) Value of Expert Assistance Reconstructing your residence following a house fire can be a lengthy process, contingent upon the extent of the destruction. Furthermore, coping with the loss of your home and belongings can be an immensely stressful and disheartening period for both you and your family. Hence, it’s advisable to seek temporary accommodations that provide a sense of familiarity, affording everyone the necessary time to recuperate from this devastating event. Dealing with the aftermath of a fire presents numerous obstacles, but partnering with the appropriate restoration team can significantly ease the burden. When facing such adversity, reach out to H2O Restoration without hesitation. Our dedication to thorough evaluation, effective cleanup, and precise restoration guarantees a swift journey toward recovery.  Final Thoughts In the face of the devastating aftermath of fires, tracking fire restoration timeframes becomes not just a logistical necessity but a beacon of hope for those affected. It’s a journey of resilience, where each step toward restoration signifies a triumph over adversity.  By understanding the complexities of fire damage restoration and the myriad factors influencing its timeline, individuals and communities can better navigate the path to recovery. From the initial assessment to the final reoccupation of the property, every stage requires patience, diligence, and collaboration. The restoration process is more than just repairing physical structures; it’s about rebuilding lives and communities. It’s about coming together, supporting one another, and emerging stronger in the face of adversity. With expert assistance, tailored approaches, and unwavering determination, the journey toward restoration becomes a testament to human perseverance and solidarity. FAQs What factors influence the restoration timeline? Factors include the size of the fire, structural damage, water damage from firefighting efforts, smoke and soot damage, availability of materials, and the complexity of the restoration process. How long does fire restoration typically take? The duration of fire restoration varies depending on the extent of the

Electrical-Fire-Safety-Tips-to-Protect-Your-Home-and-Loved-Ones
Uncategorized

Electrical Fire Safety Tips to Protect Your Home and Loved Ones

Electricity powers our everyday lives, making it hard to imagine a home without it. However, this essential utility also carries significant fire risks that are often overlooked. Be honest—how often do you leave appliances plugged in when you’re not using them, or forget to turn off devices before leaving the house? If you haven’t experienced electrical fire damage yet, consider yourself fortunate. But continuing these habits raises your risk. H2O Restoration advises that following practical electrical fire safety tips for your home can greatly help reduce these risks and protect your family and property. This version highlights the importance of electrical fire safety while integrating H2O Restoration as a trusted name for safety and restoration. From 2015 to 2019, electrical distribution or lighting equipment, such as wiring, lighting, cords, and plugs, was involved in an estimated average of 32,620 reported home structure fires per year. The vast majority of these fires could have been prevented with proper safety precautions. Many of these precautions are simple actions you can take right now. By using your electrical devices and outlets correctly, you can drastically reduce your family’s risk of an electrical fire tragedy.  To further enhance your understanding, we will share valuable Electrical Fire Safety Tips for Your Home that can help protect your loved ones and property. Please take a moment to read these tips, then go through your house to ensure everyone is following them. Help increase awareness about dangerous appliance and electrical fires in your community with these messages and free materials. What is an Electrical Fire? An electrical fire originates from electrical sources or systems, typically caused by overheating, malfunctioning, or damaged electrical components, equipment, or wiring. These fires pose a significant threat to residential, commercial, and industrial settings due to their ability to spread quickly and cause extensive damage to both lives and properties. In the United States, electrical fires have led to approximately 295 deaths and 900 injuries in residential settings. The property losses from these fires are estimated at $1.2 billion for homes and $501 million for non-residential structures. Similarly, in the European Union, electrical fires account for about 25-30% of all fires, resulting in over 1,200 deaths and causing €10 billion in property damage. Common Causes of Electrical Fires Damaged Wiring: Electrical wires can become worn, frayed, or loose over time. These issues can lead to overheating and eventually ignite a fire. Malfunctioning Appliances: Faulty or poorly maintained appliances and equipment, such as cords, kitchen appliances, and heating, and air conditioning units, can cause fires. These devices draw significant power and can become fire hazards if they malfunction. Overloaded Circuits: Plugging too many devices into a single circuit can overload it, generating excessive heat and potentially igniting nearby combustible materials. Poorly Installed Extension Cords and Power Strips: Using extension cords as a permanent solution or overloading power strips with multiple appliances can overload circuits and create fire hazards. Faulty Outlets and Switches: Loose connections, damaged components, frayed cords, and incorrect wiring can cause overheating and trigger fires. Defective Lighting Fixtures: Faulty bulbs, lamps, and other lighting fixtures can emit excessive heat, increasing the risk of fires. Using bulbs with wattages higher than recommended further exacerbates this risk. Proximity to Heat Sources: Faulty wires or electrical tools situated near combustible materials can easily start fires. Malfunctioning Electrical Systems: Electrical systems can experience short circuits, electrical arcs, and other faults, which can lead to fires. Warning Signs of Electrical Fires Recognizing the warning signs of electrical fires can help you respond swiftly and keep everyone safe. Stay vigilant and take immediate action if you notice any of the following signs: Burning Odor A distinct smell of melting plastic, rubber, or wiring is a common sign of an electrical fire. An unusual or persistent burning smell without any apparent source could indicate an electrical issue. Smoke The presence of smoke, whether visible or faint, is a clear warning of a fire. If you see smoke coming from electrical appliances, outlets, or wiring, act immediately to prevent the fire from spreading. Sparks Visible sparks from outlets, switches, or appliances could signal an impending electrical fire. Keep an eye out for intermittent or continuous sparks. Discolored Outlets Scorch marks or discoloration on outlets or switches may suggest overheating, which can lead to potential fire damage. Report these marks for immediate action. Hot Switch Plates If switch plates or outlets feel hot to the touch, it could signify an electrical problem, as heat buildup can precede an electrical fire. Flickering Lights Frequent flickering of lights, especially accompanied by a burning smell, could indicate an electrical fire hazard due to loose connections, faulty wiring, or overloaded circuits. Tripped Circuit Breakers Circuit breakers and fuses are designed to trip or blow when too much current flows. Frequent tripping without repair can lead to electrical fires. How to Put Out an Electrical Fire Due to their distinct nature, electrical fires require a specialized approach to ensure personal safety and effective fire suppression. Here’s how to handle an electrical fire in an emergency: Electrical Fire Safety Tips for Your Home Tips to Prevent Electrical Fires Follow these tips to identify potential fire hazards and prevent electrical fires in your home or business: Inspect Electrical Wiring Regularly check your electrical wiring, especially if your home is more than 10 years old. Wiring deteriorates over time, and inspections can help prevent electrical fires. Replace Old or Damaged Wiring If you notice frayed, worn out, or tattered wiring, whether it’s a power cord or your home’s wiring, repair or replace it promptly to avoid electrical fires. Check Electrical Plug  Inspect plugs on electrical appliances for fraying or damage. Broken plugs can cause shocks, sparks, or overheating, leading to electrical fires. Avoid Overloading Outlets Do not overload electrical outlets, as they can only handle a certain amount of electricity. Overloading can cause sparks and potentially start fires. Keep Flammable Materials Away Ensure that electrical appliances and outlets are not in contact with flammable materials such as blankets,

Reclaiming Fire-Stricken Properties
Uncategorized

Reclaiming Fire-Stricken Property

In building design, incorporating proper fire-safety measures is necessary to ensure occupant safety. Fire damage is one of the most destructive factors that can deteriorate reinforced concrete structures. If you’ve ever experienced a house fire, you know how frightening it can be. According to the National Fire Protection Association, there are more than 353,100 house fires each year, making this type of accident more common than you might think. Once the fire is extinguished, the real work begins. House fire damage is often severe; even small fires can cause significant harm. Repairing this damage is neither cheap nor easy. According to the U.S. Fire Administration, house fire damage costs exceed $14 billion annually. Defining Property Reclamation  Reclaiming typically refers to the broader process of taking back or repossessing something that has been lost, damaged, or abandoned, often involving significant effort to make it usable or productive again. This term is widely used in contexts such as land reclamation, where land that has been damaged or degraded (e.g., through mining, flooding, or pollution) is rehabilitated for new uses such as agriculture, housing, or recreation.  In the context of fire-stricken properties, reclaiming involves a comprehensive approach that includes initial assessment, debris removal, insurance claims, structural repairs, and finally restoring the property to a usable state. Several Key Points for Understanding Fire-Damaged Homes Safety Concerns Fire damage can compromise the structural integrity of a home, making it unsafe to enter without proper assessment and precautions. The extent of Damage Assessing the extent of fire damage is crucial, including structural damage, smoke damage, water damage from firefighting efforts, and potential health hazards like soot and toxic residue. Insurance Coverage Knowing what your insurance policy covers regarding fire damage is essential for navigating the recovery process and maximizing your benefits. Restoration Process Restoring a fire-damaged home involves various steps, including cleanup, structural repairs, addressing water damage, removing soot and smoke odor, and redecoration. Professional Assistance Hiring professionals, such as restoration specialists, contractors, and cleaners, is often necessary for safely and effectively restoring a fire-damaged home. Health Risks Fire damage can pose health risks due to exposure to toxins, soot, and mold, making it important to prioritize safety during the restoration process. Prevention Measures Taking preventive measures, such as installing smoke detectors, having a fire evacuation plan, and practicing fire safety, can help reduce the risk of fire damage in the future. 5 Steps for Reclaiming Your Fire-Damaged Homes 1. Assess the extent of the damage Once the property has been declared safe to re-enter, thoroughly assess every room for structural integrity, potentially enlisting a structural engineer, before documenting the damage, contacting your insurance provider, and refraining from disposing of any damaged items until they have been inspected by your insurer. 2. Dry out the property Promptly dispose of items soaked by firefighters, such as drywall, insulation, rugs, and carpets, and remove standing water; subsequently, thoroughly dry the property with fans and dehumidifiers to minimize water damage and prevent mold growth, necessitating quick and thorough drying due to the potential for mold and mildew to develop within 24-48 hours, with professional cleaners equipped with specialized equipment to eliminate excess moisture effectively. 3. Deep clean your home After removing soot covering property and possessions, essential for mitigating health risks including breathing issues, coronary heart disease, and cancer due to its toxic nature and difficulty to clean thoroughly, restoration specialists equipped with specialized products and equipment are necessary to ensure complete removal, as attempting self-cleaning may leave residues and pose dangers; additionally, the cleanup of toxic chemicals used in extinguishing the fire is imperative, a task best handled by professional cleaners for safe and thorough removal of residues. 4. Remove any lingering smoke odor Even after a fire has been extinguished, the lingering smoke smell and tiny smoke particles can persist, posing risks of respiratory problems and skin irritation, while the decreased air quality must be addressed to ensure the property is safe to inhabit, as smoke can penetrate hard-to-reach areas such as vents and walls, necessitating specialized tools for thorough cleaning, which professional cleaners equipped with air scrubbers and air movers can provide. 5. Repair the structural damage and redecorate Once the property has been sanitized, cleaned, and dried, restoration can commence, with tradespeople enlisted to ensure structural safety through tasks like drywall replacement, flooring installation, and roof repair, followed by consideration of aesthetic improvements, potentially involving decorators based on the extent of redecoration required. Common Challenges in Fire-Damaged Home Cleaning  Smoke and Soot Removal -Smoke and soot particles have a knack for infiltrating every corner of a fire-damaged building, presenting a formidable challenge during cleanup; their stubborn nature can lead to lasting damage if not meticulously addressed with thorough and effective fire damage cleaning techniques. Odour Elimination -The lingering smoke odor presents a persistent challenge after a fire, with its pungent smell often permeating affected areas and serving as a constant reminder of the traumatic event, necessitating thorough fire damage cleaning for effective elimination; achieving this goal demands a comprehensive approach to ensure complete removal of the odor. Structural Integrity Restoration -Fires have the potential to compromise the structural integrity of a building, rendering it unsafe for occupancy; restoring the structural elements and ensuring their stability emerges as a critical challenge in fire damage cleaning. Emotional Support and Recovery -Recovering from a fire extends beyond physical property damage cleaning; the emotional toll on individuals affected by the fire can be overwhelming, highlighting the importance of providing emotional support and guidance for their overall recovery. How to Overcome Common Challenges in Fire-Damaged Home Cleaning 1. Smoke and Soot Removal Enlist professional fire damage cleaning services equipped with specialized tools and techniques tailored for smoke and soot removal. Thoroughly clean all surfaces, including walls, ceilings, furniture, and personal belongings, using appropriate cleaning agents and methods. 2. Odour Elimination Neutralize smoke odor molecules using thermal fogging, ozone generators, or hydroxyl generators. Clean and deodorize carpets, upholstery, and curtains to eliminate embedded odors. Ventilate the space by opening windows

Uncategorized

Advancing Old Building Restoration

Leading to the Bicentennial in 1976, cities across the United States were revitalizing historic downtown areas. Jack Tadych, a sandblasting contractor new to the field, became passionate about restoration. He noticed a growing concern for preserving national landmarks. However, he felt that traditional methods like sandblasting were too harsh on the buildings. Determined to find a gentler approach, he sought to advance restoration technology. Preserving historic buildings and structures plays a significant role in maintaining a city’s character and fostering a sense of community. These structures often serve as tangible reminders of the city’s past, showcasing unique architectural styles, marking significant historical periods, or symbolizing key milestones in the city’s development.  By safeguarding these historic landmarks, we not only honor our collective heritage but also provide future generations with valuable connections to the past and opportunities for cultural enrichment. What is Building Restoration Building restoration is a special way of taking care of old buildings. It’s part of architectural conservation and historic preservation. The focus is on keeping places like historic sites, houses, and monuments in good shape through regular maintenance. The goal is to keep these places looking true to their original form and prevent them from getting damaged or changed so much that they’re hard to recognize later on. If your goal is to make your building look as good as it did when it was first completed, then a restoration is needed. Restorations return a building to its original style and look without changing its structure. If a new system is needed, like a furnace, this will be done in a way that replicates the authentic style of the building without interfering with its appearance. Types Of Treatment In Building Restoration Historical conservation means taking care of old sites and artifacts. When it comes to buildings, there are four main ways to do this, each with its own goals and boundaries. Preservation Preservation means keeping a historic building’s original structure, materials, and appearance intact. This involves protecting and stabilizing the building, prioritizing maintenance and repairs over replacing or adding new elements. Rehabilitation Making changes to an old building to fix it up while keeping its historical, architectural, or cultural significance. This might involve repairing or adding things, but any new parts should look just like the original ones in terms of design, color, texture, and materials if that’s possible. Restoration Bringing a property back to how it looked at a certain time. Builders take out old, worn-out parts of the building and put in new ones that look just like the original ones in terms of design, color, materials, and texture. Reconstruction Making a brand-new building that looks exactly like how the original one did at a certain point in history. What to Consider in Restoring Old Buildings 1. Historical Significance Understanding the historical and cultural significance of the building and ensuring that restoration efforts preserve its authenticity. 2. Structure Integrity Assessing the structural condition of the building and addressing any issues to ensure its stability and safety. 3. Preservation Guidelines Adhering to local preservation guidelines, regulations, and historic district requirements when planning and executing restoration work. 4. Authentic Materials Using authentic materials and traditional construction methods whenever possible to maintain the building’s original character. 5. Budget and Funding  Establishing a realistic budget for the restoration project and exploring potential sources of funding, such as grants, loans, or private donations. 6. Skilled Professionals  Hiring experienced architects, engineers, contractors, and craftsmen with expertise in historic preservation and restoration techniques. 7. Environment Impact Considering the environmental impact of restoration activities and incorporating sustainable practices, such as energy-efficient upgrades and waste reduction measures. 8. Long-Term Maintenance Developing a maintenance plan to ensure the ongoing care and preservation of the restored building for future generations to enjoy. 9 Steps You Might Take When Restoring An Old Building 1. Assessment  Evaluate the building’s condition and historical significance. 2. Planning  Develop a restoration plan considering structural needs, historical accuracy, and budget. 3. Documentation  Record detailed documentation of the building’s current state and historical features. 4. Permissions  Obtain any necessary permits or approvals from local authorities or heritage organizations. 5. Conservation Implement measures to stabilize and protect the building from further deterioration. 6. Restoration  Restore damaged or missing elements using appropriate materials and techniques to match the original design. 7. Monitoring  Continuously monitor the building’s condition during and after restoration to address any issues that arise. 8. Maintenance Establish a maintenance plan to ensure the long-term preservation of the restored building. 9. Public Engagement Involve the community in the restoration process through education and outreach initiatives. Sustainable Benefits of Restoration of Old Buildings Recycling of Building Materials Energy Savings Looking For Professionals Who Can Assist In Restoring Old Buildings? To ensure that you’ll have a successful restoration you will need individuals who assist in restoring an old building is needed for ensuring a smooth and successful restoration project. These professionals bring a wealth of expertise, experience, and dedication to the endeavor, working together to breathe new life into a cherished piece of history.  When it comes to restoring old buildings, trust in our expertise at H2O Restoration.  Our qualified restoration service is here to guide you through every step of the planning and restoration process. We specialize in preserving the historical integrity of buildings while ensuring they meet modern standards. Let us help you bring your restoration project to life with care and precision. Final Thoughts The journey of advancing old building restoration is a testament to our commitment to preserving our architectural heritage. The sustainable benefits of recycling materials and energy savings further reinforce our commitment to environmental stewardship. Building restoration involves meticulous steps, from assessment and planning to documentation and conservation, all aimed at maintaining historical integrity. With various treatment approaches like preservation, rehabilitation, restoration, and reconstruction, we ensure these structures stand the test of time.  In the endeavor of advancing old building restoration, we honor our architectural heritage and ensure its preservation for future generations. FAQs Why should I consider

Rebuilding-Your-Life-Post-House-Fire
Uncategorized

Rebuilding Your Life Post-House Fire

In the United States, a home fire was reported every 88 seconds in 2022, according to the National Fire Protection Association. According to the Red Cross, a staggering 80% of Americans aren’t aware that small house fires are the most common disaster in the United States. It’s surprising, but the aftermath of a house fire can be devastating, causing extensive damage both inside and outside the house. Experiencing a house fire can be a traumatic and overwhelming experience for any homeowner. Once everyone is safe and the fire department has put out the fire, there are several steps that a homeowner can take to start the process of recovering from the damage.  Importance of Having a Plan After a House Fire Having a plan after a house fire is a must for several reasons. It helps you stay organized and focused during a chaotic time, allowing you to tackle necessary tasks efficiently. A plan ensures that you address immediate needs, such as finding temporary housing and contacting insurance companies, promptly.  It provides a roadmap for long-term recovery, outlining steps for rebuilding and restoring your home and possessions. Having a plan can alleviate stress and anxiety by providing a sense of direction and control amidst uncertainty.  Also, it facilitates communication and coordination with family members, contractors, and support services, fostering a collaborative approach to recovery. Having a plan after a house fire is essential for navigating the aftermath effectively and facilitating a successful recovery process. What to Do after the House Fire 1. Find a safe place to stay If your home is too damaged to stay in, find a temporary place to stay. If you can’t stay with friends or family, reach out to local disaster relief agencies like the American Red Cross or Salvation Army. They can help you find a temporary place to stay until you can go back home. 2. Let Family and Friends know you’re Safe When word spreads about your house fire, your family and friends may worry. Take some time to reach out to them when you can. It helps keep everyone updated and let them know how they can support you. 3. Contact your Insurance Agent After a house fire, you should start an insurance claim and address immediate needs. Your insurance agent may provide an advance for “Loss of Use” from your policy to cover living and daily expenses if necessary. Keep all receipts and records of purchases if you receive an advance. Your agent can also assist in securing your property and offer advice on cleaning up or restoring salvageable items. 4. Protect your Home Even if your home is damaged and you can’t stay there, as the owner, you usually have the responsibility to protect it from further risks like bad weather or break-ins. This might involve boarding up windows, securing doors, or other safety measures until repairs can be made. 5. Address your Finances Even if your home is destroyed, you may need to continue making your mortgage payment. You might also need to continue any car payments and replace any credit or debit cards that may have been destroyed in the house fire. 6. Throw Away Damaged Items When deciding what to throw away after a fire, pay attention to items like plastics, canned or boxed food, medicine, and hygiene products that may have been exposed to fire and could be contaminated by smoke and soot. It’s important to document what you discard by taking pictures for documentation purposes. This helps with insurance claims and replacing essential items. 7. Recover Your Possessions Insurance typically covers items destroyed in a house fire, usually under a replacement cost policy in homeowner’s insurance. In such cases, you’ll initially receive the actual cash value of your damaged items at the time of settlement. Once you replace the items, you may recover the replacement cost.  Consider creating a home inventory of your possessions to ensure proper accountability for everything. This inventory should include the date of purchase, the cost of purchase, and a description of each item. Having a thorough inventory can streamline the claims process and help you get the compensation you deserve. Steps You Can Take To Start Rebuilding Rebuilding your life after a house fire can be an immensely challenging and emotional journey, but it’s also an opportunity for growth and resilience. 1. Ensure Safety Before anything else, make sure you and your loved ones are safe. If the fire department hasn’t already done so, have professionals inspect the property to ensure it’s structurally sound. 2. Process Emotions It’s normal to feel a range of emotions after such a traumatic event – shock, grief, anger, or even relief that everyone is safe. Take the time to acknowledge and process these emotions. Consider seeking support from friends, family, or a therapist. 3. Contact Insurance Notify your insurance company as soon as possible to begin the claims process. They can guide you through the necessary steps and help you understand what is covered by your policy. 4. Document Damage Document the damage to your property and belongings thoroughly. Take photos and videos of the entire property, including both the interior and exterior, as well as any damaged belongings. This will be important for your insurance claim. 5. Secure Temporary Housing If your home is uninhabitable, arrange for temporary housing for you and your family. This could be with friends or family, in a hotel, or through temporary rental accommodation. 6. Assess Finances Evaluate your financial situation and determine what resources you have available for rebuilding. This may include insurance coverage, savings, assistance from organizations or government agencies, or crowdfunding. 7. Create a Rebuilding Plan Work with professionals such as architects, contractors, and restoration specialists to develop a plan for rebuilding your home. Consider factors such as budget, timeline, and design preferences. 8. Prioritize Essentials Identify the most critical needs for your family’s well-being and prioritize rebuilding those aspects of your home first. This may include essentials like a safe and functional

The Causes of Basement Leaks and Simple Solutions
Uncategorized

The Causes of Basement Leaks and Simple Solutions

98% of basements in the U.S. will experience some water damage at least once. A neglected basement resembles an overlooked corner of our homes, often hiding in plain sight yet holding significant importance for the overall health of our living spaces. While it’s easy to disregard this seemingly dingy area, neglecting basement maintenance can lead to costly consequences.  Much like ignoring a small crack in a boat’s hull can lead to sinking, disregarding basement issues can result in great damage to your home. High humidity levels foster an environment ripe for mold and mildew growth, posing health risks to you and your family.  Moreover, water damage can compromise the structural integrity of your property and diminish its value over time. Thus, keeping your basement free from water intrusion is necessary for maintaining a safe and valuable home. What Leads to Basement Leaks? Knowing the underlying causes of basement leaks is indispensable for effective prevention. Two common causes are hydrostatic pressure and the clay bowl effect. 1. Hydrostatic Pressure A primary cause of basement leaks, hydrostatic pressure results from groundwater exerting force against the basement’s foundation walls and floor. When rain saturates the soil around your home, the excess water applies pressure on the foundation. Over time, this pressure can force water through cracks or gaps in the foundation, leading to leaks. 2. Clay Bowl Effect During construction, builders excavate soil to lay the foundation and then backfill around it. The soil used for backfilling is often looser and more permeable than the undisturbed soil deeper underground, creating what’s known as the clay bowl effect. When rain or groundwater reaches this backfilled soil, it accumulates around the foundation like water in a bowl. This trapped water can increase hydrostatic pressure on the foundation walls, resulting in leaks. What to Do When Your Basement Leaks Dealing with basement leaks can be frustrating, but taking prompt action can prevent further damage. Once you’ve identified the source of the leak, here are steps to mitigate the issue before the next rainfall: 1. Inspect Gutters and Downspouts Clogged gutters and downspouts can lead to overflowing water, which can pool around your foundation and seep into your basement. Ensure proper drainage by cleaning out leaves and debris from gutters and downspouts. 2. Seal Foundation Cracks Examine both the exterior and interior of your foundation for cracks or gaps. For minor cracks, an interior sealant may suffice. However, severe cracks should be addressed by a professional to prevent further water infiltration. 3. Address Grading Issues Ensure that the grading around your home slopes away from the foundation. Poor grading can cause water to accumulate near basement walls, increasing the risk of leaks. Adding soil around the foundation can help improve drainage. 4. Clean Window Wells Similar to gutters, window wells can become clogged with debris, hindering proper drainage. Clear out any leaves, dirt, or obstructions to allow water to flow freely and drain from the window wells. 5. Seek Professional Assistance If you’re unable to identify or resolve the leak, it’s wise to contact a reputable basement waterproofing company. They can assess the damage and recommend effective solutions to permanently address the issue. How to Identify the Source of Basement Leaks If you’re dealing with a basement leak, knowing its origin is essential. Common areas to check include the floor joint, walls, windows, and plumbing fixtures. Here’s how to track down the source: 1. Basement Floor Joint Leaks Signs of a basement floor joint leak include a wet floor, floor cracks, water stains, mold, bubbling or peeling paint, and efflorescence. These signs may develop gradually or become more evident after heavy rainfall. 2. Basement Wall Leaks Basement walls, vital for supporting your home’s foundation, can also be prone to leaks. Look for: – Cracks: Stress-induced cracks due to settlement or ground movement. – Pipe penetrations: Improperly sealed pipe passageways. – Grout gaps: Eroded grout lines in masonry walls. Watch for visible indicators like wall cracks, peeling paint, crumbling mortar, rust, and efflorescence. 3. Basement Window Flooding Basement window flooding can result from: – Poorly draining window wells. – Incorrect foundation grading. – Inadequate window well sealing. Look for puddles, rotting wood frames, rusted metal frames, drafts, air leaks, and window condensation. 4. Plumbing Issues Basement leaks may also stem from plumbing problems such as: – Failing water heaters: Look for water pooling near the heater. – Damaged washing machine hoses: Watch for leaks around the hoses. If you suspect plumbing issues, contact a plumber promptly to prevent extensive water damage. The Causes of Basement Leaks and the Importance of Professional Solutions Understanding the causes of basement leaks and how to solve them is important for homeowners to maintain a safe and healthy living environment. Identifying the root causes allows for proactive measures to prevent further damage and potential health hazards associated with mold growth and structural compromise.  Seeking assistance from professionals ensures accurate diagnosis and effective solutions tailored to specific issues, minimizing the risk of recurring problems and costly repairs. Ultimately, addressing basement leaks promptly not only preserves the integrity of the home but also safeguards the well-being and investment of its occupants. If you’re experiencing basement leakage in our service area, our team at H2O Restoration is ready to assist you. With our expertise in basement waterproofing, we’ll ensure your basement remains dry and comfortable.  FAQs How to find the source of the water leak in the basement? To find the source of a water leak in the basement, begin by inspecting common areas prone to leaks, such as the floor joints, walls, windows, and plumbing fixtures. Look for visible signs of water intrusion, including dampness, water stains, mold growth, or musty odors. Utilize tools like moisture meters or conduct visual inspections to pinpoint the exact entry point. Once identified, take appropriate measures to address the source of the leak and prevent further damage. How to stop a basement wall from leaking? To stop a basement wall from leaking, start by inspecting the exterior and

2024 Water Damage Restoration Costs: Homeowners Need to Know
Uncategorized

2024 Water Damage Restoration Costs: Homeowners Need to Know

Water damage is one of the major problems among homeowners in the U.S. as it was reported that around 14,000 people in the U.S. are affected by water damage daily, with restoration costs ranging from $1,300 to $5,600. Though it’s a significant expense, it’s needed in many situations. The sight of water leaking into your home—whether from an overflowing toilet, a burst pipe, or a natural disaster—can be terrifying. While such incidents are relatively rare, it’s important to understand the potential costs of water damage restoration. Planning for this type of disaster is especially wise if you live in an old home, a flood-prone area, or a region susceptible to typhoons, tropical storms, or hurricanes. This way, you can start budgeting for potential restoration expenses. Average Water Damage Restoration Cost Water damage restoration essentially means cleaning up after water has infiltrated your home. If water does get into your home, it’s important to address it promptly to prevent mold, mildew, or even more severe damage. In most situations, hiring a professional for water damage restoration is the best course of action. Below, we’ll explore the low, average, and high costs associated with repairing water damage. Average Cost $3,300 Highest Cost $13,000 Lowest Cost $450 Cost by Category of Water Damage Not all water damage is the same; in fact, there are three distinct categories of water damage, each with its associated repair costs. Let’s break down each category and explain the costs involved in repairing the damage. Category 1: Clean Water $3 – $4 per square foot Category 2: Gray Water $4 – $7  per square foot Category 3: Black Water $7 – $7.50  per square foot Category 1: Clean Water Clean water is water that hasn’t been contaminated by chemicals or biohazardous materials (like fecal matter). Common sources include leaky faucets, toilet tanks, or water heaters. The repair costs for clean water damage are typically around $3 to $4 per square foot. The primary task is drying out the area, which keeps costs relatively low. However, extensive damage can drive up the price. For example: – Drying carpet: $1 to $11 per square foot – Repairing or replacing drywall: $1 to $3 per square foot Category 2: Gray Water Gray water contains potentially harmful substances, such as laundry detergent or food particles from a dishwasher leak. Due to the risk of contamination, the restoration cost for gray water is higher, ranging from $4 to $7 per square foot. Additional repair costs might include: – Replacing hardwood flooring: $10 to $15 per square foot – Repairing drywall: $1 to $3 per square foot Gray water damage often results from overflowing appliances or toilet leaks where water is exposed to urine or cleaning solutions. Category 3: Black Water The most severe type of water damage, black water, involves water contaminated with sewage or groundwater. The average restoration cost for black water is between $7 and $7.50 per square foot. However, because black water poses significant health risks, anything it touches typically needs to be replaced, including: – Drywall – Furniture – Flooring – Carpeting – Clothing and other furnishings Estimating the total cost for black water damage can be challenging due to the extensive replacement required. Water Damage Restoration Costs by Class To assess the extent of work required for cleanup and restoration, professionals categorize water damage by class. Each class corresponds to a specific price range for water damage restoration, as detailed below. WATER DAMAGE CLASS PRICE RANGE Class 1 $150 – $500 Class 2 $550 – $1,000 Class 3 $1,100 – $3,200 Class 4 $20,000 – $100,000 Class 1 Class 1 refers to minor water leaks, affecting only a small portion of a room (e.g., a minor toilet leak). Most homeowners can handle this level of water damage without needing professional help. Class 2 Class 2 water damage affects an entire room, including the walls. While the cleanup is relatively straightforward for professionals, water may have penetrated the flooring and possibly furnishings, increasing the complexity and cost. Class 3 Class 3 water damage involves water saturating every part of a room, or multiple rooms. This includes ceilings, walls, flooring, and even subflooring. Restoration costs are significantly higher due to the need to replace structural materials. Class 4 Class 4 represents the most severe water damage, often resulting from hurricanes or extensive flooding. This level of damage spreads rapidly throughout the home, affecting all surfaces and requiring extensive repairs and replacements. Restoration costs for Class 4 damage typically range from $20,000 to $100,000. Costs by Location Water damage can affect any part of your home, but the costs for repairs vary significantly depending on the location. Here’s a breakdown of common water damage repair costs by location. Roof If you have a roof leak, it has to be addressed quickly to prevent extensive damage to multiple areas of your home. Roof leaks often result from missing shingles or structural issues. Repair costs typically range from $500 to $1,800, depending on the cause and extent of the leak. Floors and Hardwood Water can cause severe damage to both carpeting and hardwood flooring. Repairing water-damaged hardwood flooring generally costs between $200 and $550. Drywall Water contact with drywall poses a significant risk for mold growth. Major leaks often necessitate drywall replacement, costing between $1.50 and $3.00 per square foot. Additional costs for repainting the repaired wall may apply. Ceiling Water leaks from above, such as from a roof or an upper floor, can compromise the integrity of the ceilings below. The average cost to repair a water-damaged ceiling ranges from $350 to $1,250. Additional Factors That Affect Water Damage Restoration Cost When dealing with water damage in your home, restoration costs can vary widely due to several factors. Labor Labor costs play a significant role in the overall expense of water damage restoration. The cost will depend on: – The severity of the water damage – The experience and skill level of the technicians – The number of hours worked, including

Homeowners’ Water Damage Prevention Guide
Uncategorized

Water Damage Prevention Guide for Smart Homeowners

Water damage can wreak havoc on your home, leading to costly repairs, structural issues, and potential health hazards. Whether it’s from a burst pipe, a leaking roof, or a natural disaster, water damage is a significant threat to homeowners everywhere. However, with proactive measures and a solid prevention plan in place, you can protect your home from the devastating effects of water intrusion. In this guide, we’ll explore practical strategies and tips to help you prevent water damage, detect potential issues early, and effectively prepare for emergencies. By implementing these measures, you’ll not only safeguard your property but also gain peace of mind knowing that your home is resilient against water-related threats. Sources and Causes of Water Damage Plumbing problems and adverse weather are key contributors to water damage in homes. Leaky pipes and severe weather conditions like heavy rainfall or storms can lead to gradual accumulation or sudden influxes of water, damaging walls, ceilings, and floors. To prevent such damage, homeowners should conduct regular plumbing inspections, promptly fix leaks, and maintain their drainage systems.  Being mindful of local weather patterns and implementing preventative measures like proper landscaping and roof maintenance can help mitigate risks. Ensuring the home’s design and construction include water-resistant materials, proper insulation, and ventilation can address vulnerabilities and protect against water damage. Importance of knowing Prevention for Home Water Damage Home water damage prevention is not just a proactive measure; it’s a fundamental responsibility that ensures the longevity and resilience of your living space. Preventing water damage in your home is crucial for several reasons.  Water damage prevention preserves your home’s value, making it easier to sell in the future and minimizing insurance costs associated with previous claims. It provides peace of mind, allowing you to enjoy your home without constant worry about leaks, floods, or other water-related emergencies. Step-By-Step Guide For Personalized Prevention Plan Crafting a personalized water damage prevention plan necessitates a systematic approach that aligns with the distinctive attributes and requirements of your residence. By adhering to a structured guide, homeowners can cultivate a thorough strategy to mitigate water damage risks and promptly address any potential issues. 1. Assessment of Vulnerabilities Start by assessing your home’s vulnerabilities. Think about where you live, the weather, how old your house is, and what it’s made of. This evaluation will help you pinpoint places that could be at risk of water damage, like basements, crawl spaces, or spots where water doesn’t drain well. 2. Exterior Maintenance Checklist Create a checklist for keeping your home’s outside in good shape. Remember to clean gutters and downspouts before the rainy season so water can flow freely. Plan to adjust the grading and landscaping regularly to keep water from pooling near the foundation. Check drainage systems often to make sure they’re not blocked. 3. Internal Area Inspection Develop a timetable for examining the inside of your house. Pay close attention to water supply lines, plumbing fixtures, and appliances. Look out for indications of leaks, like water stains, damp spots, or mold growth. Consistent inspections aid in identifying and resolving problems promptly. 4. Basement and Crawlspace Preventions Outline specific steps for basement water damage prevention. Include basement waterproofing methods like sealing cracks and applying moisture-resistant coatings. Describe the installation of a sump pump with a battery backup system to remove excess water. Address crawl space encapsulation and attic ventilation to maintain a dry environment. 5. Timely preparations Before each season, safeguard your home with these essential steps. In winter, insulate exposed pipes to prevent freezing and bursting, disconnect outdoor hoses, and drain irrigation systems. For renovation projects, create a checklist to protect water supply lines, shut off the main valve, and ensure proper drainage to prevent water damage. These measures can help you avoid costly repairs and maintain your home’s integrity year-round. 6. Response Plan Develop a clear response plan for addressing water damage emergencies. Include steps such as shutting off the main water supply, contacting emergency professionals, and documenting damage for insurance claims. Provide instructions for safely handling electrical systems and appliances in water-affected areas. 7. Educating Family Member Highlight the significance of educating all family members about the prevention plan. Teach them how to identify signs of leaks, locate shut-off valves, and operate basic plumbing fixtures. Emphasize the importance of prompt communication and action in case of emergencies. 8. Regular Review and Updates Highlighting the importance of ongoing review and updates to the prevention plan is crucial. Encourage homeowners to revisit the plan periodically, particularly after home renovations or changes in the household. Stress the significance of staying informed about new technologies or methods for water damage prevention. By regularly reassessing and updating the prevention plan, homeowners can ensure it remains effective and aligned with their evolving needs, ultimately enhancing the protection of their homes against water damage. Understanding Home water Damage and Guidance from Professionals  In the quest to maintain a safe and secure living environment, home water damage prevention emerges as a cornerstone of responsible homeownership. By understanding the diverse sources and causes of water damage, implementing exterior and interior measures, and adopting vigilant detection and response strategies, homeowners can effectively safeguard their properties against the potential risks of leaks and flooding. In securing and protecting your home from future water damage, consider seeking help from professionals. Our team at H2O Restoration is here to provide expert guidance and assistance in home water damage prevention. With our extensive experience in safeguarding homes from water damage, we’re dedicated to ensuring your home remains safe, secure, and comfortable for you and your family. Final Thoughts Water damage poses a significant threat to homeowners, potentially causing costly repairs, structural issues, and health hazards. However, with a water damage prevention plan and guide, you can shield your home from the devastating effects of water intrusion. This guide offers practical strategies and tips to prevent water damage, detect issues early, and prepare for emergencies effectively. Moreover, by implementing these measures and staying informed about new technologies and methods, you can safeguard

Scroll to Top